The Essence of the 8-bit 6502 programming for NES (Nintendo Entertainment System) should be the Sprites. So, what is a Sprite? A Sprite is a moving object in the game, e.g. Super Mario, plane, bullet.
Almost in every 8-bit NES games, there are spirits. There are at most 64 Sprites supported, which has the index from 0 to 63 inclusive. You can control the spirits and let them move in the screen.
There are two sizes/dimensions that can be defined for Sprites, either 8×8 (Single tile) or 8×16 pixels (Double tile). Every Sprite takes four byte to define, so 64 spirits takes up 256 bytes, in the SPRAM (Spirit RAM), which is independent from VRAM and RAM.
The way to access (read or write) SPRAM is quite similar to VRAM except that it only takes 1 byte (8 bit) to specify the address and every time when the data is written to SPRAM, the pointer/address is automatically incremented by 1 byte. So if you have some continuous data, you just have to set the address once.
The CPU mapping address is 0x2003 for SPRAM and the data address is 0x2004. For example, if you want to write 1 and 2 to the 7-th and 8-th byte of the SPRAM, you can do this:
#define address(add) (*(u8 *)(add)) // macro to access the memory
address(0x2003) = 7;  // set the location to 7
address(0x2004) = 1;  // write value 1 to 7-th
address(0x2004) = 2;  // write value 2 to 8-th (pointer address increments one)
The 256 bytes represent 64 spirits. The byte offset 0 to 3 denotes the first Sprite, the byte offset 4 to 7 denotes the second Sprite and this goes on to the 63 Sprite which is represented by byte offset 0xfc-0xff.
For each Sprite, the first byte is the y coordinate in pixel and the fourth byte is the x coordinate in pixel. The second byte is the tile number (known as index number of the pattern). The third number is the attribute for the Sprite (we will cover that in the future tutorial).
We can then have a macro to set the specified Sprite.
#define address(add) (*(u8 *)(add)) // macro to access the memory
#define putSP(n, x, y, t, a) address(0x2003)=n*4;\
                             address(0x2004)=y;\
                             address(0x2004)=t;\
                             address(0x2004)=a;\
                             address(0x2004)=x
Now, we are going to show a tiny example that controls the spirit using joystick. [This tutorial] covers the details of using joysticks in 8-bit NES.
#include "conio.h"
#include "nes.h"
#include "stdio.h"
#include "stdlib.h"
#include "string.h"

typedef unsigned char u8;
#define address(add) (*(u8 *)(add))
#define button_A          0x80
#define button_B          0x40
#define button_SELECT     0x20
#define button_START      0x10
#define button_UP         0x08
#define button_DOWN       0x04
#define button_LEFT       0x02
#define button_RIGHT      0x01

#define presskey(k) (key & (k))
#define iskey(k) (key == (k))
#define downkey(k) (okey!=key && (k)&key)
#define upkey(k) (okey!=key && (k)&okey)
#define putSP(n, x, y, t, a) address(0x2003)=n*4;\
                             address(0x2004)=y;\
                             address(0x2004)=t;\
                             address(0x2004)=a;\
                             address(0x2004)=x

u8 read_joystick_1()
{
      u8 n = 8, joy_state = 0;
      address(0x4016) = 01;
      address(0x4016) = 00;
      while(n){
           joy_state = (joy_state<<1) | address(0x4016) & 1;
           --n;
      }
      return joy_state;
}

void main()
{
      u8 key,x=100,y=60;
      address(0x2000) = 0x80;
      address(0x2001) = 0x1e;
      while(1){
           key = read_joystick_1();
           if(presskey(button_UP)) --y;
           if(presskey(button_DOWN)) ++y;
           if(presskey(button_LEFT)) --x;
           if(presskey(button_RIGHT)) ++x;
           waitvblank();
           putSP(0,x,y,'*',0);
           gotoxy(0,0);
           cprintf("x:%-3d y:%-3d", x, y);
      }
}
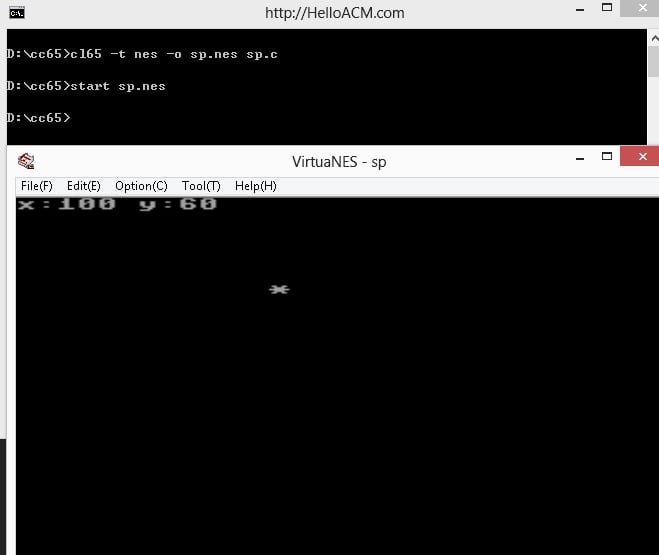
To compile the above example, use command cl65 -t nes -o sp.nes sp.c assumed the source C file is sp.c. You can then use any NES emulator (e.g. Virtual NES) to run the example.
The above example reads from joystick and control the Sprite which is the star and prints out the coordinates on the top-left corner of the screen.

The pre-compiled NES can be downloaded here.
–EOF (The Ultimate Computing & Technology Blog) —
Last Post: Bouncing Balls Animation Made in Processing Programming Language
Next Post: How to Revive Old Posts using PHP and Crontab